The Eco-Cooler for Free Air Conditioning

Screenshot

Today we explore a completely passive air conditioner with no moving parts. You may have heard of it. It’s called the Eco-Cooler and it was invented by Ashis Paul, a Bangladeshi innovator.

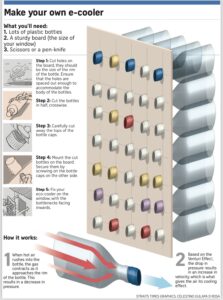
In 2016, news outlets around the world reported on his creation of a low-cost, electricity-free air conditioner made from recycled plastic bottles. This design aimed to help people in rural Bangladesh cope with the sweltering summer heat, especially those living in homes with limited access to electricity.

The Bernoulli principle and the ideal gas law are the two fundamental principles at play in air conditioners. In theory, an Eco-Cooler functions on the same principles as any compressor driven A/C unit.

The Bernoulli principle states that for an incompressible fluid (like air) flowing in a horizontal stream, an increase in the speed of the fluid is accompanied by a decrease in its pressure. This means as air flows faster, it experiences a drop in pressure. This speed and pressure change is created in the Eco-Cooler as the air stream is forced through the much smaller opening of the bottle neck, causing it to speed up.

The ideal gas law describes the relationship between pressure, volume, and temperature of a gas. According to the ideal gas law, this lower pressure causes the air stream to get hotter by what’s known as adiabatic heating. If this heat can be removed, the air will be chilled upon expansion.

In essence, Bernoulli’s principle creates the pressure differential that drives the heat transfer process in air conditioners, and the ideal gas law explains how this pressure change affects the temperature of the faster moving gas (air in the case of the Eco-Cooler). This interplay of principles is essential for achieving the cooling effect in air conditioners.

I have a treat for you today. I finally took the time to sit down and work out all the engineering behind this simple design.

Here’s what I came up with:

Eco-Cooler, 2L Bottle

Assumptions:
Air speed: v₁ = 2.5 mph (1.12 m/s)
Air pressure: P₁ = 1 atm = 101,325 Pa
Air temp: T₁ = 40°C (313.15°K)
Air density: ρ = 1.225 kg/m³
Specific heat ratio, Cp/Cv: ɣ = 1.4

Given:
D₁ = 4.25” (11 cm)
D₂ = 0.5” (1.27 cm)

Calculate Areas:
A₁ = 𝛑(11/2)² = 95 cm²
A₂ = 𝛑(1.27/2)² = 1.267 cm²

Calculate velocities:
By the continuity formula…
A₁v₁ = A₂v₂
v₁ = 1.12 m/s
v₂ = 95•1.12/1.267 = 84 m/s

Calculate pressures:
ΔP = 0.5 ρ(v₂²-v₁²)
= 0.5•1.225•(84²-1.12²)
= 4,321 Pa
P₁ = 101,325 Pa
P₂ = P₁ + ΔP
P₂ =101,325+4,321 =105,646 Pa
P₂/P₁ = 1.043

Calculate Temperatures:
T₂ = T₁ (P₂/P₁)^((ɣ-1)/ɣ)
= 313.15•(1.043)^(0.4/1.4)
= 316.9°K
= 43.8°C

(As a result of radiative cooling)
T₂ => 313.15°K

After expansion
T₃ = T₂ (P₁/P₂)^((ɣ-1)/ɣ)
= 313.15•(1/1.043)^(0.4/1.4)
= 309.4°K
= 36.3°C
= 97.34°F (down from 104°F)

And there you have it ladies and gentlemen. This is how the Eco-Cooler is supposed to work. However…

The Eco-Cooler, while innovative in its concept of a passive cooling solution, has a mixed reputation. You will find lots of YouTube video reviews online and virtually every one of them claims that it doesn’t work.

I think it’s clear why. In the design, as described, there is literally no means by which to remove the excess heat energy. You must cool the compressed air before allowing it to expand again if you want satisfactory results. Isn’t that how your standard compressor operated A/C unit works? Of course it is.

The faster moving air at the outlet may help increase evaporative cooling effects but that wasn’t the purpose for its compression in this design. It makes absolutely no sense to immediately allow the hot air to re-expand without having removed excess heat energy from it first.

The addition of heat radiating fins to a pipe of increased length would give this thing a fighting chance. The longer path would provide additional time to carry out the heat transfer. In extreme cases it may even be necessary to use a water bath to carry off that excess heat. Yes, this would add expense and complexity but the dividends in performance should be well worth it.

Eco-Cooler Summary

So, to summarize then,

Pros

Low Cost and Simple Design: Made from recycled materials like plastic bottles, the eco-cooler is very inexpensive to build. It doesn’t require electricity, making it suitable for off-grid locations.

Passive Cooling: The design utilizes the Bernoulli principle for a passive cooling effect, offering an alternative to energy-intensive air conditioners.

Environmental Benefits: By using recycled materials and avoiding electricity, the eco-cooler has potential environmental benefits.

Cons

Limited Cooling Capacity: In its basic form, the eco-cooler’s cooling effect is relatively weak and may not be sufficient for significant temperature reduction, especially in hot climates.

Real-World Limitations: Factors like friction and imperfect heat transfer can hinder the effectiveness of the cooling process.

Need for Improvement: The basic design requires modifications like pre-cooling with radiator fins to achieve a more noticeable cooling effect.

Zeer Pot: How To Make A Practical Non Electric Refrigerator

You don’t need electricity to cool food or medicine with a zeer pot. I’m gonna go over the basics of what zeer pots are and how they work so you can make one yourself.

How-To-Make-A-Practical-Non-Electric-Refrigerator-Zeer-Pot A zeer pot is a container made of materials that are specially chosen to take advantage of evaporative cooling. It was first discovered in ancient Egypt 3000 thousand years ago then re-discovered and popularized in the early 2000s by the Nigerian teacher Mohammed Bah Abba. In rural Africa, without the conveniences of Westernized countries, preserving food is very difficult. By manufacturing and mass distributing zeer pots to the poor, he was able to bring refrigeration to tens of thousands of impoverished farmers and home makers, enabling them to extend the usable life of their produce from days to weeks.

These practical refrigerator pots work on the same principle as swamp coolers do. They are a logical addition to your sustainability projects. You won’t be able to freeze anything with them but they’ll extend the life of whatever you’re trying to keep fresh inside.

How does an evap cooler work?

In order for water to evaporate from a liquid to water vapor, it needs energy. It gets that energy from the area immediately surrounding it. That’s how sweat works (Eww). Your body perspires onto your skin and your body heat or the heat from the air (or sun) then provides energy to the drops. Since it’s touching your skin as it evaporates, it pulls in some heat energy from your skin as it disappears. Less heat means more cool.

Just like the swamp cooler (evaporative cooler), the drier the air is around the pot, the better it works. The amount of water vapor in the air is called relative humidity. Basically, just like a towel, the air at a certain temperature and pressure can only hold so much water in it. If it’s already full, it won’t be able to take any more. If its dry, it takes it more easily. A zeer pot works exactly the same way.

How to make a Zeer pot

A zeer pot is actually two pots, one inside the other. The outside pot is made of a porous earthenware (clay) pot. The inside is made of the same thing but can be glazed on the inside to keep the humidity from the inside, where the food goes. Wet sand is packed between the two pots and a wet towel or clay lid is placed on the top of the center pot.

Non-Electric-Refrigerator-Zeer-Pot

So how it works is really simple. Because the sand is wet and the clay pot is porous, the water soaks into the pots. The outside of the pot (and wet towel at the top) is in contact with dry air and so it evaporates. As it evaporates, it pulls more water from the sand as well as heat energy. The water in the outside pot starts to cool down, which then cools down the wet sand. The inside pot also cools off because it’s soaked with water. A cool pot means cool food. If you really want to get technical on how it works and how to build one, Appropedia has a good article.

Zeer pot video

I know some of you’d rather watch a movie than read a book, so here’s a video:

Or you can watch this one with a little more detail of the science behind a Zeer pot.

Ways to increase the efficiency of a Zeer pot

The system works fairly efficiently through wet material but air is an insulator. If you have to keep the inside of the pot dry, it will cool but not as well. In this case, you’d want to glaze the inside of the inner pot. The inside temperature will depend on the outside temperature. If you do it right, you can expect to keep your food about 20 degrees cooler this way.

Things like airflow, relative humidity, the materials used and surface area affect how well the system works so playing around with those things can make them more efficient – or less.

To increase the zeer pot’s effectiveness, put the whole thing on a metal rack or hang it from above. This will expose the bottom of the pot to the air and help airflow around it.

To work even more efficiently, the inside pot could be unglazed and filled with wet sand or even water. This means whatever you’re cooling will be sitting in wet sand but you may be able to wrap it in some kind of plastic to keep it dry (which will insulate it somewhat on its own but not as much, depending on how you’re doing it.

What should work but doesn’t

Some intuitive ideas are in fact just wrong headed. For example, you may think that putting the pot in a cool basement would be better because the outside temperature would be less, making the inside temperature less. The problem is that if the basement is damp, its relative humidity is going to be high so the water won’t evaporate very well. Burying the pot in damp earth would be even worse.

You might think that putting it in the sun would make it more efficient. This isn’t likely to be the case. It isn’t just the evaporation that’s cooling your water, it’s the evaporation coming from the heat of the water. If you heat up the pot by 10 degrees from the sun and it takes 10 degrees from the water to evaporate the exposed areas, you haven’t cooled off the inner pot. A certain amount of sun can make it more effective though.

This particular project is a great one for experimenting. If you want to get ideas from what other people have done, search google for what people have done in 3rd World nations such as Nigeria, Sudan or India. There are many NGO’s (non-governmental agencies) that test and experiment with things like Zeer pots.

How-To-Make-A-Practical-Non-Electric-Refrigerator-Zeer-PotPhoto by: instructables.com

Learn more and see step-by-step instructions at instructables.com.

So to sum it up, to make yourself a zeer pot, you just need a couple of porous containers and some wet sand. To make that idea useful, you can use whatever you have available even if you don’t have any porous pots. Just remember that you need the water to evaporate and that evaporation is affected by things like airflow. Oh, and don’t forget that you need to keep the system wet in order for it to work or there’ll be nothing to evaporate.

Simple!

Curated and aggregated from:
Source1
Source2