The Teachings of a Coffee Percolator

In the first article posted to this website, I acknowledged the coffee percolator as the device that ignited my life long fascination with machines that have no moving parts. I remember being astonished that such a simple contraption should be able to perform the miracle of making 30 cups of coffee seemingly without effort.

Today, I want to spend a little time examining the coffee percolator to see how it works and maybe determine what it is that all machines with no moving parts have in common.

The Percolator: A Simple Brewing Machine

The coffee percolator, a stalwart of kitchens for decades, stands as a testament to the ingenuity of engineering. At its core, it is a machine that achieves its purpose without the need for any moving parts. Yet, it’s a marvel of fluid dynamics and heat transfer.

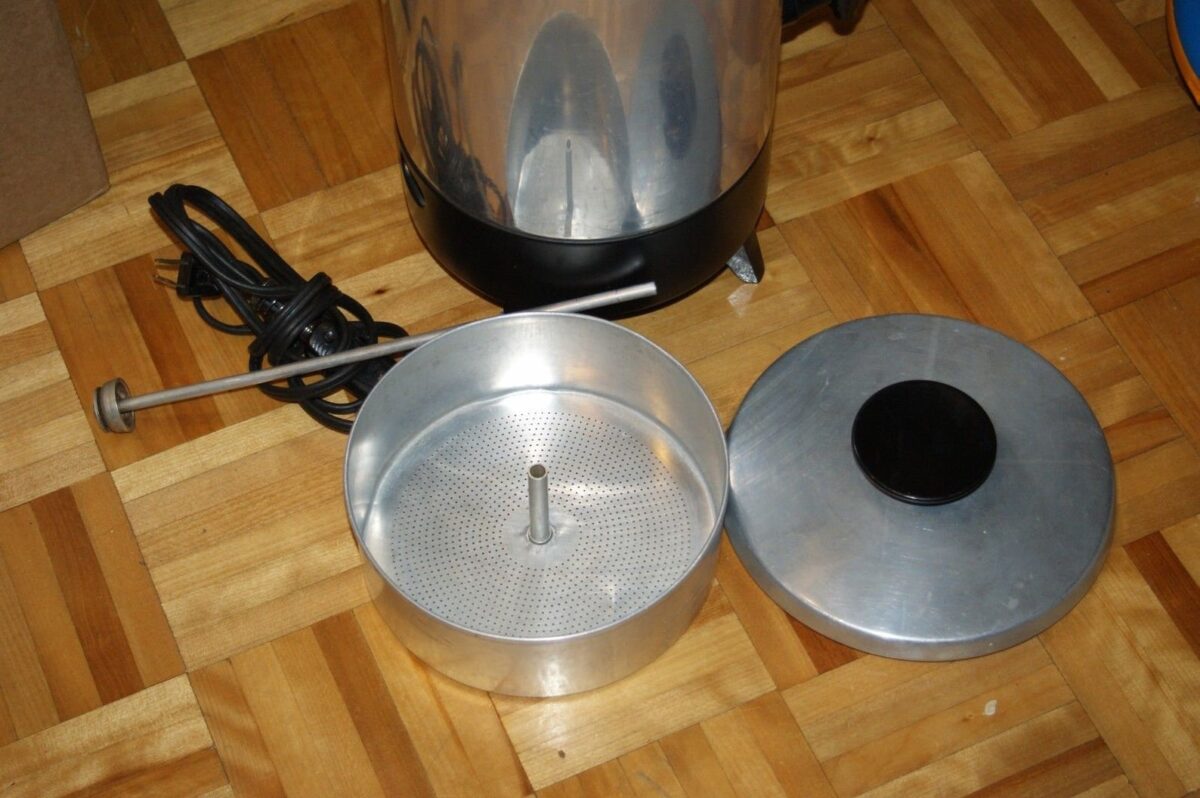
A percolator is essentially a vessel with a central tube that reaches nearly to the bottom. There is a basket containing coffee grounds at the top of the open tube. Water is heated at the base, and as it vaporizes, it forces its way up the tube, lifting the water column as it goes. At the top, the water runs out over the tube and percolates down through the coffee grounds in the basket. It drips back into the main chamber, where it is reheated, and the cycle repeats. The process continues until the desired coffee strength is achieved.

There are three distinct functions involved with the operation of a coffee percolator. None of these require moving parts to be realized.

  1. Water lift:
    To provide liquid to the basket, a bubble pump lifts a column of water through the central tube.
  2. Percolation:
    The water then percolates down through the coffee grounds to extract flavors and color making coffee in the process.
  3. Filtration:
    The coffee is filtered through a porous membrane, usually a disposable paper filter. This helps retain the grounds in the basket while allowing the coffee to slowly return to the reservoir.

The Working Principles

The key to the percolator’s operation lies in the interplay of heat, pressure, and gravity.

There are no pumps, gears, or motors involved; the process is driven solely by the physical properties of water and heat.

The heat source, typically an electric coil or gas flame, provides the energy to convert water into a gas, steam.

Lifting a fluid by gasses is not unique to coffee makers. Here are some other examples:

Geysers:
These natural phenomena occur when groundwater is heated by magma, creating steam that forces water to the surface.

Bubble columns:
These are industrial reactors where gas is bubbled through a liquid, promoting mass transfer and chemical reactions.

Thermosyphons:
A related device that rarely involves a lifting gas, thermosyphons use the natural circulation of a fluid due to density differences caused by temperature variations. They are often used in heating systems and solar water heaters.

While these examples might seem vastly different from a coffee percolator, they all share the underlying principle of fluid movement driven by pressure differentials.

Perks of Percolation

Percolation too is not unique to coffee makers. While the percolator is primarily known for its coffee-making abilities, the principle of percolation itself has far-reaching applications. In chemistry.

Filter washing:
Percolation is a technique used to separate components of a mixture. A solvent is passed through a filter containing the mixture, and different substances are extracted at varying rates. This process is essential in industries such as pharmaceuticals, food processing, and environmental science.

Water purification:
Water filtration systems often employ percolation through layers of sand, gravel, and charcoal to remove impurities. We recently posted an article on this very thing. This natural filtration process is a cornerstone of many municipal water treatment plants.

Cave creation:
Groundwater naturally percolates through rock and soil. This is important for clear, freshwater springs. Over millions of years and under certain conditions, this percolation can create limestone caves. As the water flows, it removes material by dissolving it away.

A Dawning Revelation

The percolator, with its simple yet effective design, showcases the power of fluid dynamics and heat transfer. It is a reminder that complex tasks can often be achieved through elegant and minimalistic means. By understanding the principles behind the percolator, we gain a deeper appreciation for the underlying physics at work in countless other systems, from coffee brewing to water purification and beyond.

Our detailed examination of the coffee percolator has exposed hints to answer our all consuming question:

“What do all machines with no moving parts have in common?”

And the answer is simple … Fluids.

A fluid is a substance that deforms continuously under the application of a shear stress, no matter how small the stress may be.  

In simpler terms, a fluid is a substance that can flow and change its shape easily.

Key characteristics of fluids

  • No definite shape; they take the shape of their container.
  • Ability to flow under the influence of gravity or applied forces.
  • Low resistance to shear stress.

In general, we can talk about two classes of fluids.

Physical fluids:
Fine particulate matter, liquids, gases, and plasmas.

Fluidic Energies:
Electrical currents, electromagnetic waves, sound, fields and thermal gradients.

Fluids are the unseen workhorses of many machines. All machines with no moving parts rely on fluids to do work and perform their function.

Often there are multiple fluids involved. The work is accomplished through changes in pressure, flow, volume, temperature, fields, frequency and other physical phenomena.

Moving forward, every time you encounter a new machine with no moving parts, I would urge you to analyze it to identify the fluid(s) it uses and the fluidic properties employed to make it function.

Water For Life

Few things in life are more important than having a supply of clean, fresh, pure, and safe drinking water. A solar distillation system is a great option and we will investigate that in a future post. For now, let’s explore another approach that uses no moving parts… a filter.

The filter I’m about to describe will provide water at least as good as the venerable Berkey but much more cheaply and without the cost of expensive cartridge replacements. It’s based on the one shown here in this video.

As good as that seems, I need to advise caution before using just any clay pot. While natural clay is rarely seriously contaminated with heavy metals, the processing and handling of terra cotta pots can sometimes render them unsuitable for use as water filters.

I recommend you look for a pot made in Italy and avoid anything from China or the Middle East.

Warning: Before using your terra cotta pot, cleanse and/or test it for heavy metals such as lead. Contaminated pots can leach harmful substances into the filtered water. Follow the procedure outlined below to test the pot for contaminants.

If you’re not sure of the quality of the clay pot material, I would strongly advise to pre treat it twice with hot cleaning vinegar. White vinegar has 5 percent acidity; while cleaning vinegar, on the other hand, has 6 percent. Although it’s only a one percent difference in acidity, it actually results in a 20 percent difference in strength.

Decontaminating Your Pot

Make sure the drainage hole is plugged with a cork and/or paraffin wax. Fill your pot to the top with your hot vinegar solution and let it weep through the clay. The reason for this is that acetate ions will bind to most heavy metals that may be in the clay. All acetates are water soluble (or most – if memory serves correctly) and the most toxic metals will form acetates, so this would take care of free floating microscopic metal bits, for the most part. Then run 2-4 potfuls of plain hot water through to wash out the acetates (could take all day). The main thing is to try to leach out all the lead from the clay.

Testing Your Terra Cotta Pot

In the end, the only way to know for certain that your pot is acceptable is to test it. The simplest way is to purchase a kit like this one. Fill your pot with distilled water and let it soak for several hours. You may want to place it in a clean glass or plastic tub to expose the outside to the water. After some time, use your test kit to check the leachate. Do not use that pot until after the vinegar cleansing process can be done successfully and the test passes.

If you’re more of a DIY kinda person, try adding 1 gram of Sodium Hydroxide (NaOH) or Potassium Hydroxide (KOH) to 10 ml of your leachate in a glass tube or beaker. The exact measures are not super critical. What is important however is your safety. Be sure to wear gloves and googles. Handle the hydroxide with care.

Add a few milligrams of pure Sulfur to your solution and slowly heat it. Let it boil for a few minutes. If you observe a black or dark gray precipitate, do not use that clay pot. This is the classic Sodium Sulfide Lead test. In the presence of Lead, black Lead Sulfide will drop out of solution. Please note that it is possible to get a false positive. If copper, nickel, iron, mercury, cobalt or cadmium are present, you will get a similar dark color change reaction. Forget what I said about a false positive. If your solution turns black you can be sure you are dealing with some type of heavy metal contamination. Regardless of the exact species, you don’t want to use that pot for drinking water.

Building a Water Filter Using Terra Cotta Pots

Once you have found the pot you want to use (8” is probably a good size for the suggested sun tea jar), it’s time to start building.

Materials List

Assembling the Filter

  1. Prepare the Pot:
    • Ensure it is free from cracks and damage.
    • Clean the terra cotta pot thoroughly with water. Ensure it is dry before use.
    • be sure to seal the bunghole.
  2. Small Pebbles:
    • Add a layer of small pebbles to the bottom of the pot. This layer will help with drainage and keep the finer materials from clogging the exit holes.
  3. Activated Charcoal:
    • Add a layer of activated charcoal on top of the small pebbles. Charcoal helps in removing impurities, odors, and some chemicals from the water.
  4. Fine Sand:
    • Add a layer of fine sand on top of the carbon. Sand helps in filtering out smaller particles and debris from the water.
  5. More of the Same :
    • Add alternate layers of charcoal and sand until the pot is nearly full.
  6. Rusty Nails:
    • Mix a handful rusty nails into the last layer of sand. The iron oxide from the rusty nails will adsorb arsenic from the water, making it safer to drink.
  7. Top Layer of Small Pebbles:
    • Add another layer of small pebbles on top of the sand. This will prevent the sand from moving around when water is poured in.

Using the Filter

  1. Position the Filter:
    • Place the assembled terra cotta pot on top of the glass jar. Ensure it is stable and securely positioned inside the mouth of the jar.
  2. Fill with Water:
    • Pour water into the pot, allowing it to percolate through the layers of pebbles, sand, charcoal, and rusty nails.
  3. Collect Filtered Water:
    • Collect the filtered water in the glass jar. The water should be clear and free from larger particles.
  4. UV Sterilization (optional):
    • Solar water disinfection (SODIS) is one of the cheapest and most suitable treatments to produce safe drinking water at the household level.
    • Expose the glass jar to direct sunlight for at least 6 hours or 48 hours in cloudy weather to allow UV rays to sterilize the water, killing any remaining pathogens.
    • The SODIS method should not be used at all in constant rainy conditions.

Maintenance

  1. Regular Cleaning:
    • Periodically clean the layers to prevent clogging. Remove and replace the sand, charcoal, and rusty nails as needed to maintain filter efficiency.
  2. Check for Contaminants:
    • Regularly test the filtered water for contaminants to ensure it remains safe for use.

By following these steps, you can build an effective water filter using a terra cotta pot, ensuring the removal of heavy metals and sterilization of the water. Always ensure the materials used are safe and free from contaminants to maintain the quality of the filtered water.