A Time for Reflection

Let’s consider a new machine with no moving parts… a mirror. Oh. You say you’re not sure a mirror qualifies as a machine?

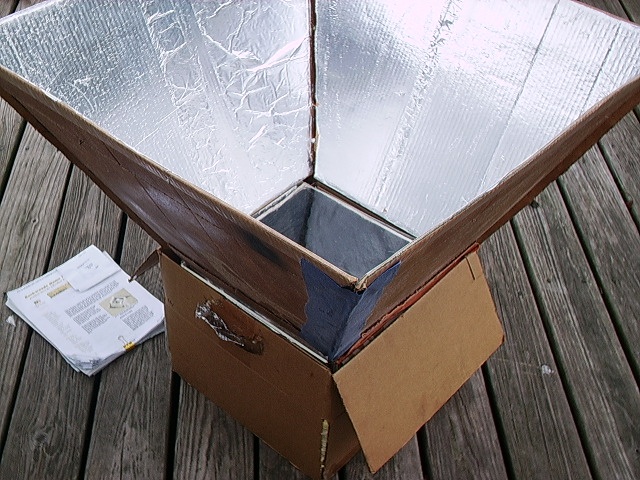
Well, OK then. Let’s make the mirror part of a solar oven. Feel better now? LOL

With that out of the way, let’s say we have a spherical oven with a round opening to receive solar energy. What would it take to create a light collecting mirror that would maximize the amount of energy directed into our oven? Obviously, we need a wide opening at the top. The wider the better, right? And the angle of the mirror should be such that every ray of light that strikes the mirror is reflected into our oven.

Waste not, want not, I always say. Before we leave that thought, can we agree that a rectangular setup of four flat mirrors, although easy to make, cannot meet our requirements since the surfaces near the corners reflect at sub optimal angles.

Break It Down For Me

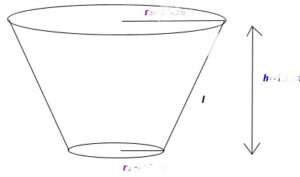
Well, we must conclude that in order to maximize the collection of solar energy fed into a circular opening, we need a conical funnel, technically called a frustum, designed with the following characteristics:

  • Area:

    The area at the top of the funnel must be large enough to capture all the energy required for our design. Solar insolation is generally taken to be 1000 watts per square meter. Good to know.

  • Funnel angle:

    Funnel angle is the angle between the slant side of the funnel and the vertical axis. This is actually called the ‘half-angle’ since there is a duplicate on the other side. It is typically measured in degrees. While it is true that a wider funnel angle will increase the projected area of the funnel’s opening, we already know the area required to accept the amount of sunlight that is to be collected. The angle must be chosen to assure that all the captured light is actually directed into the opening we are trying to target. Although it may look strange, the formula for this angle is:

    Ø = ½cos⁻¹(½(D/d-1))

    Where:
    D is the large diameter at the top and
    d is the smaller bottom diameter

  • Important note: If D/d is 3 or greater, this formula will fail. You must either reduce your large diameter or increase the small one. Ratios of 3 or more require infeasibly small angles. Like, you know? Straight up. That’s no good. LOL. So, watch your selection of D and d values. Oh, and smaller ratios will produce shorter solar funnels. That calculation is the next step.
  • Funnel height:

    The height of the funnel is chosen in coordination with the two diameters to achieve the desired angle. The formula is:

    Height = (D-d)/(2tan Ø)

    Where the variables have been previously defined.

  • Sun angle:

    The funnel should be oriented so that the angle of incidence of sunlight is as close to 90° as possible. This simply means it needs to be pointed directly at the sun if we want to ensure that the maximum amount of sunlight is collected. Surprise! Duh.

Show Me An Example

Ok, for example, we might decide we want to design a 650 watt solar oven. To achieve this would require an area of 0.650 m² at the top of our funnel given the normal amount of solar radiation that reaches us on a sunny day. We can make the following calculation:

D = 2*sqrt(0.650/𝛑) = 0.91 m or 36”

Let’s suppose we decide that a 14” diameter opening is a suitable size to feed our oven. We can now derive the proper funnel angle:

Ø = ½cos⁻¹(½(36/14-1)) = 19.1°

And finally, the height must be:

H = (36-14)/(2*tan(19.1)) = 31.77”

You can check your work by testing this relationship:

(D-d)/(D+d) = tan Ø/tan 2Ø

All that remains is to make a flat pattern to fabricate our funnel. There is a nice calculator available here. It even tells you the size of the sheet material you will need. That material must be as smooth as possible with a mirror finish. Any imperfections will reflect light in directions not consistent with our goal.

Crinkled aluminum foil is probably not the best answer you could come up with. Aluminuzed mylar will probably work for a while. Be aware however, the aluminum will slowly oxidize over time and the alumina (aluminum oxide) will flake off. This is unfortunate indeed.

Explain The Theory Behind Your Numbers

Sure. We are assuming that the solar rays of light are parallel and enter the funnel straight on, that is, we are pointed directly at the sun and perfectly aligned. Any rays coming in without touching the reflector simply enter straight into our oven. In practice, without a functioning tracker device, this won’t be true but we must start somewhere.

We know from physics that the angle of reflection equals the angle of incidence. Our reflector angle must be such that it will map every incoming incident ray across the entire opening. What this means is that a ray that strikes the middle of the reflector must enter the oven through the center of the opening. One that just manages to strike the reflector at the bottom edge must enter right near there while one that catches the top of the reflector must be deflected all the way across the space to enter at the other side. All reflected rays are in parallel as they enter the oven opening.

The angle formula given above does exactly this. In order to achieve this optimal angle, we must adjust the height of our funnel. This is essentially the equivalent of focusing. By adjusting the height we can focus the incoming light to exactly match the size of our opening, thus maximizing the input energy.

So, there you have it. It looks like you got a two-fer with this post. We set out to explore mirrors as machines with no moving parts and learned something about solar ovens in the process. We aim to please. Enjoy.

Bonus2: Another pattern calculator.

DIY O₂ Absorbers

Can an O₂ absorber really be considered a ‘machine’? Well, I’d say it is a device which is engineered and constructed to provide a desired, useful function based on scientific principles. On that basis I would definitely call it a machine of sorts. And furthermore, it’s a machine with no moving parts! Exactly the sort of thing we excel at around here.

Oxygen is a good thing. But what it does, that is… oxidize stuff, isn’t good for things we want to protect and save. It makes them age. Free atmospheric oxygen corrodes metals, makes oils go rancid, bleaches and fades pigments and dyes, and most annoyingly, spoils food and vitamins.

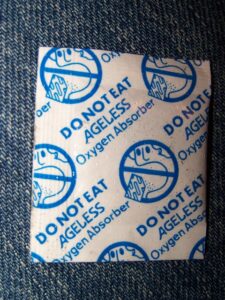
The answer is O₂ absorbers. Oxygen absorbers are highly recommended as a means of helping preserve dry goods such as fine art, firearms and most especially, food which has been stored away for use in a future emergency. Oxygen absorbers are placed inside sealed containers and are intended to do exactly what it says on the tin… absorb atmospheric oxygen to prevent it from interacting with the preserved materials. Do NOT confuse oxygen absorbers with desiccants for humidity control. Those are entirely different.

Oxygen Absorbers

Modern oxygen absorbers will come in sizes that range from 20 cc to 2000 cc. The size of the oxygen absorber refers to the amount of free oxygen that it can take out of an environment.

Therefore, a 20 cc packet can only remove 20 cc of oxygen, while a 400 cc packet can take away 400 cc of oxygen.

Recommended oxygen absorber usage based on container size is as follows:

  • 1 pint – 50 cc
  • 1 quart – 100 cc
  • 1 gallon – 400 cc
  • 5 gallon bucket – 2000 cc

Begin Nerdy Engineering Talk

One gallon equals 3.78 liters. Chemistry buffs will recognize that one gallon of a gas consists of 3.78/22.4 moles of substance at standard temperature and pressure. If 21% of that gas is oxygen then it means:
(3.78/22.4)*(21/100) = 0.0355 moles of oxygen O₂ are present. A mole is just a number, a count of molecules.

Also note that by volume:
21% * 3.78 L = 0.7938 L
(nearly 800 cc)

O₂ absorbers work by a chemical reaction that captures free oxygen. Rusting iron is just the ticket. This reaction also releases some heat energy and is commonly employed in the design of chemical hand warmers. A 400 cc oxygen absorber is considered to be sufficient to collect all the free O₂ from a gallon jar if it’s filled with product. This is roughly ½ of the O₂ in an empty jar as we have just calculated. What we are assuming is that a jar filled with product will still have up to ½ of its volume taken up by air; and 400 cc of that is oxygen. If your jar is not filled or you think more than half the volume contains air, use more absorbing capacity. There is no danger in adding too many packets.

This means we need to scale our stoichiometry to absorb at least:
0.0355/2= 0.0178 moles of O₂.

We will be forming Fe₂O₃ rust, so each mole of Fe₂ anions will capture 1.5 moles of O₂.

Accordingly, that requires:
0.0178/1.5 = 0.0119 moles Fe₂

Now, consulting the periodic table of elements we find:
The Atomic Mass of iron (Fe) = 55.845 g/mol

Therefore, we determine that we need :
2 * 55.845 *0.0119 = 1.33 g of iron to complete the absorption.

Let’s Build It

We will use steel wool instead of iron powder in our design because it is more easily sourced. Remember, more surface area is better so use a fine wool Do not use wool with soap or anticorrosion coatings.

We want:
Grade – 0000#
Grade Name – Super Fine
Typical Use – Sanding furniture

Ordinary (non-stainless) steel wool is made from a low-carbon steel and should be in excess of 98% iron by mass. To obtain the desired iron content we need:
1.33 / 0.98 = 1.35 g. steel wool.

NOTE: There is nothing wrong with oversizing our design by using “too much” iron, other than the extra expense of course. But when you think about it, wouldn’t it be foolish to risk $100 or more in food (not to mention your very life when you are depending on that food in a survival situation!) just to save a penny? Don’t do it!! Feel free to use up to 5x the requirement and be assured of safety. If you check, you’ll find that most commercially produced O₂ absorbers are made exactly this way. I think 2-3 grams of steel wool is a fine approach here.

Optional Step:
Add sufficient bentonite clay (kitty litter) or activated charcoal and work it into the steel wool. These porous materials will hold the water necessary for catalyzing the oxidizing reaction.

A pound of activated charcoal has the same surface area as six football fields. That’s a lot of crannies for storing water so you don’t need much.

A little known fact about adding charcoal is that it will cause a small amount of carbon monoxide (CO) to form inside your container. This, in combination with the reduced oxygen atmosphere will help kill any insects that might be hiding in your storage container. Not to worry though, it isn’t enough to harm anyone and will quickly dissipate when the container is opened.

Wrap this material together in a piece of paper towel or coffee filter forming a pouch. Tape or staple it closed and secure it to the underside of the jar lid. Double sided tape might be the perfect thing here.

These units may be made up in bulk to be used as needed. Unlike commercial oxygen absorbers, there are no special storage conditions such as vacuum packing necessary. They require activation before the rust reaction will start in earnest. Simply keep them dry and you should be good, although, a couple of silica gel packets couldn’t hurt here to be sure.

How to Activate and Use Your Oxygen Absorber

NOTE: Sea water is a good rust promoter. The salinity (saltiness) of the ocean is about 35 parts per thousand. This means that in every liter of water, there are 35 grams of salt.

Make a salt water solution of 3-5 g. per 100 ml. (About ½ teaspoon per ¼ cup of water.)

Before sealing the jar, moisten the packet with about an ⅛ teaspoon of this brine solution. A simple spritz with a spray bottle to dampen the paper should be sufficient.

With salt and water present, the oxygen reacts with the iron in the steel wool to form iron oxide (Fe₂O₃) and release heat.

Wait to be sure the packet is getting warm and then proceed. Remember that we mentioned CO formation? This heat is what will cause that to happen. Apply the jar lid and ring. The absorber will draw a vacuum for sealing. The lid should ping to prove it.

There is one caution you should be aware of. This is an IMPORTANT one.

When using oxygen absorbers to store foods, it is vital that the food be dry! The moisture content must be below 10%. The reason is that botulism likes to grow in moist, low oxygen environments. Be careful.

You may read on the internet that you should not use oxygen absorbers and silica gel packets together. This is because oxygen absorbers require moisture to activate them as we have seen. Silica gel packets will absorb moisture and your oxygen absorbers may not work.

I believe this shouldn’t be a problem if you’re sure to separate them from your O₂ absorber so it has a chance to work before the moisture is drawn away. Experiment a little for yourself to see what works.