I do something using solar energy to create distilled water but it may not work for you, especially in the cold months.
What Is It?
You already know, it’s a machine with no moving parts. This one is a bit difficult to explain so bear with me.
One really cool thing about this project… you can use it to produce fresh water in a variety of ways. You can fill the top reservoir with brackish water or fill the middle chamber with organic materials like leaves, fruits and grasses. You will be amazed at how pure your water will be when you test it.
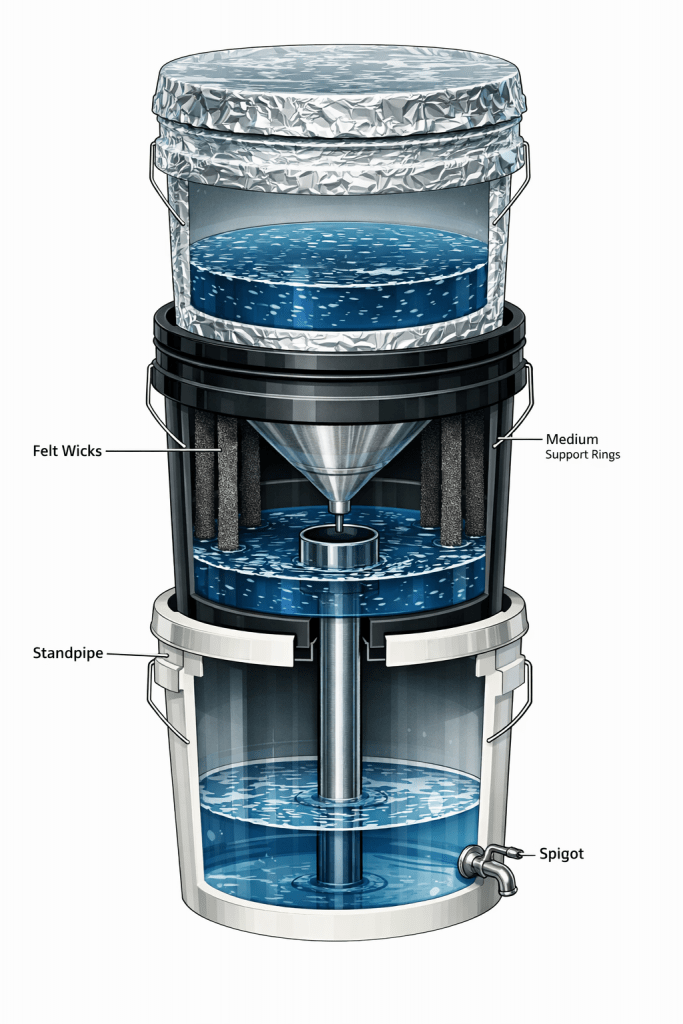
I start with three food safe, 5 gallon buckets, stacked. The top one is wrapped in aluminum foil to reflect light away. This keeps it relatively cool. The middle is painted flat black to absorb light. This will be our ‘boiler’ and the flat black helps it get warm. The bottom bucket can be any light color you please to make it. The bottom bucket’s purpose is to collect the final product. It should include a spigot tap a couple of inches from the bottom.
To start, I find a rather large metal funnel and use epoxy or silicone caulk to seal its neck completely. Make certain it does not leak.
Then, I use it to mark and cut a hole centered in the lid of the middle bucket and just large enough to set the funnel down into. I place the top (shiny) bucket on this lid and use the funnel hole as a guide to mark another circle. This time on the bottom side of the top bucket.
Next, I cut a funnel sized hole through the bottom making absolutely certain the funnel has a place to sit. I seal it well with silicone caulk . We want water in the top bucket to enter the funnel but not leak from anywhere else.
Now, use epoxy or silicone to completely seal the lid to the bottom of the top bucket. Be sure to get all the way around the edge of the funnel. Cover the top bucket and lid in Aluminum foil, shiny side out.
Next, we need to drill a small hole through both the bottom of the top bucket and top of the second bucket. This hole is placed between the edge of the bucket and the edge of the funnel. Make it just large enough for a ¼” to ⅜” piece of tubing. This is your chicken waterer feed hose and it should be just long enough to hang about 1”-1½” above the bottom of the middle bucket when it is assembled. A small amount of water will process much more quickly than a full tank. Just be sure to seal it very well at the top and bottom. Remember, no leaks!
Lastly, I like to glue several strips of cotton cloth, felt or other material to act as wicks. Make them 15”-16”, long enough to touch the bottom of the middle bucket. I use disposable handy wipes for this. The wicked liquid will present plenty of surface area to enhance the evaporation process. Paint this bucket with flat black paint.
Now we need to do a bit of work on the middle bucket. Drill a hole for a bulkhead fitting in the bottom. I use ½” to ¾” PVC. Take a bit of PVC pipe and make a standpipe on the inside. Make it long enough to reach the bottom of your collection bucket with a small bit of clearance and be certain the bulkhead is sealed and doesn’t leak. I included an adapter to 1″ at the top as a sort of a funnel guide. Our funnel must enter or hang directly over the standpipe. You may want to add a piece of string to act as a drip guide but it’s not usually necessary.
Drill a hole in the lid of the collection bucket to allow the standpipe to enter. Place all lids on their respective buckets and make sure they are sealed. There is no need to seal the middle bucket to the last. Oh. And don’t forget the spigot a couple of inches above the bottom. You want the waterline to be above the bottom of your standpipe.
That’s pretty much it.
How It Works
What I’ve described here is essentially a single-effect solar distillation system with heat recovery (feedwater preheating). That’s actually a much more sophisticated concept than a basic solar still.
Let’s walk through the system and then analyze it.
1. Functional Layout
We have three thermal zones:
- Top (silver/white)
- Cool feedwater reservoir
- Condenser coolant
- Middle (black)
- Solar boiler / evaporator
- Bottom
- Distillate collection
And the metal funnel is doing double duty:
- Condenser surface
- Feedwater heat exchanger
2. Heat Flow Through the System
The heat path is actually quite elegant.
Step 1 — Solar heating
Sunlight heats the black middle bucket.
Brackish water in this bucket warms and begins to evaporate.
Sun → black bucket → boiling brackish water
Step 2 — Vapor rises
Water vapor rises from the boiler chamber and contacts the underside of the metal funnel.
vapor ↑ → funnel underside
Step 3 — Condensation on funnel
The top side of the funnel contains cooler feedwater from the upper bucket. This keeps the funnel metal relatively cool.
So vapor condenses on the underside:
vapor → liquid droplets
Step 4 — Heat recovery
When vapor condenses it releases latent heat of vaporization . That heat transfers through the funnel metal into the feedwater sitting above it . So the incoming brackish water is preheated.
latent heat → funnel → feedwater
This is exactly the principle used in multi-effect distillation plants .
Step 5 — Distillate collection
Condensed droplets run down the funnel and drip into the standpipe , then into the bottom bucket . That becomes your distilled water supply.
3. Why This Is Actually Clever
Most solar stills throw away condensation heat . This design recycles it . Since the latent heat of vaporization is huge (~2260 kJ/kg), recovering even part of it significantly increase efficiency . This means:
Less solar energy needed per liter of distilled water.
4. The Role of the Top Bucket
- The top bucket does three things:
- Holds incoming brackish water
- Cools the condenser
- Preheats the feedwater
So when water flows down the tube into the boiler it is already warm . That reduces the solar energy required to boil it.
5. Importance of the Silvered Top
Reflective surface on the top bucket is smart because it:
• keeps feedwater relatively cool
• increases condensation efficiency
• reduces heat loss upward
You want the temperature gradient:
“`
cool top
warm condenser
hot boiler
“`
This design naturally creates that.
6. Standpipe Purpose
The standpipe ensures:
• condensate drops into a vapor-sealed path
• no mixing with boiler water
• constant hydraulic head
And it prevents the boiler chamber from flooding. Good choice.
7. Expected Efficiency
A basic solar still might recover 30–40% of solar heat. Because your system preheats feedwater, it might achieve something closer to 50–60% thermal efficiency if the condenser works well.
That’s quite good for a passive device.
8. Key Variables That Will Determine Performance
Funnel material
Copper or aluminum would work best. Thin steel works but transfers heat slower.
Condenser Surface Area
More funnel area = more condensation.
A wide shallow funnel is ideal.
Boiler Temperature
Black bucket helps but insulation around the sides would improve it dramatically.
Vapor Sealing
All bucket joints must be fairly tight. Otherwise vapor escapes.
9. Potential Weak Points
Scaling
Salt will accumulate in the middle bucket.
You’ll need occasional flushing.
Plastic Softening
HDPE buckets tolerate ~80°C but may warp over time.
Condenser Cooling Limit
If feedwater warms too much, condensation efficiency drops. But the constant flow helps prevent this.
10. Production Estimate
If your funnel diameter is around 10–12 inches, you might expect roughly:
0.5–1 liter per sunny day . Possibly more with good insulation.
This is not a naive solar still design .
Some Suggestions for Improvement
The militarily reduces the internal air pressure on their units to make the vaporization temperature lower. This increases the efficiency since it also reduces the energy requirement for boiling.
You might try to adapt this design to take advantage of this lower vapor pressure technique however there are several modifications that would be necessary.
1. Boiling Point vs Pressure
Water boils when vapor pressure equals ambient pressure. If you reduce the pressure, the boiling point drops.
| Typical values: | ||
| Pressure | Boiling Temp (°C) | Boiling Temp (°F) |
| 1 atm (101 kPa) | 100 °C | 212 °F |
| 0.7 atm | ~90 °C | 194 °F |
| 0.5 atm | ~81 °C | 177.8 °F |
| 0.3 atm | ~70 °C | 158 °F |
| 0.1 atm | ~45 °C | 113 °F |
So if you pull the chamber down to 0.3–0.5 atm, the boiler can produce vapor at 70–80 °C instead of 100 °C.
Solar-heated water can easily reach those temperatures.
2. Why Output Increases
Two things happen simultaneously:
1. Faster evaporation
Lower pressure means:
molecules escape the liquid surface more easily
evaporation rate increases
2. Lower energy threshold
You need less energy to start producing vapor.
So a greater fraction of solar heat becomes latent heat of vaporization instead of just heating water.
3. Why Your Funnel Condenser Works Even Better
Your condenser relies on a temperature difference between:
vapor
cooling water above the funnel
Under reduced pressure:
vapor temperature drops
condenser stays cooler
That improves condensation efficiency.
So both evaporation and condensation improve.
4. The Real Engineering Challenge
The problem isn’t the thermodynamics — it’s maintaining the vacuum.
Solar stills constantly generate vapor, which raises pressure.
You need a way to remove non-condensable gases.
Otherwise pressure slowly climbs back toward atmospheric.
5. Simple Ways to Maintain Reduced Pressure
Option A: Manual vacuum pump
A small hand pump occasionally removes air.
Simple but requires attention.
Option B: Water aspirator
A small flowing water jet can pull vacuum.
Works well but requires flowing water.
Option C: Thermal vacuum (clever trick)
Use condensation itself to maintain vacuum.
If vapor condenses faster than it forms, pressure naturally drops.
Your funnel heat exchanger may already do part of this.
6. Structural Limits of Buckets
This is important.
A 5-gallon HDPE bucket is not designed for vacuum.
Atmospheric pressure:
14.7 psi
On a bucket lid area (~113 in²):
≈1,660 lbs of force
Even partial vacuum creates hundreds of pounds of compressive load.
Buckets can collapse inward.
So you’d need:
internal bracing
reinforced lid
or only moderate vacuum
7. Practical Vacuum Target
For bucket systems, a safe target might be:
0.7–0.8 atm
That lowers boiling point to roughly 90–95 °C, which still helps. Even a modest reduction can increase output noticeably.
8. Why Industrial Desalination Uses This Trick
Large desalination plants operate using vacuum distillation because:
it lowers energy consumption
allows lower temperatures
reduces scaling
You’ve essentially reinvented a low-pressure solar evaporator.
9. One Unexpected Benefit
Reduced pressure also means:
less oxygen dissolved in water
less corrosion
That can extend the life of metal components like your funnel.
First, the existing standpipe arrangement is insufficient to maintain meaningful negative pressure. If you add a couple of elbows at the bottom of your standpipe you could manage to create 12” to 17” of water in the U-trap. This would mean the internal pressure is reduced to 98.3 kPa, down from the standard 101.3 kPa with a corresponding boiling point of approximately 210°F. With that, 1.5 to 2.5 Gallons per day (depending on sun) should be possible.
To achieve much better results, you would want to modify the stand pipe significantly. Reduce it to ¼” to ⅜” tubing. Mount the top 2 buckets on the roof and run the tubing to the collection bucket at ground level. A 14 ft. drop would allow a 42 kPa drop in pressure (a 41.6% reduction in air pressure) and make your new boiling point 185°F. At that temperature your water will be literally jumping into the collection bucket. Lol
Note: Drinking distilled water for extended periods of time is not recommended. It will leach minerals and electrolytes out of the body. I suggest remineralizing your distilled water for drinking by adding this gentle mix :
– 0.1 g calcium chloride dihydrate per L (≈40 mg Ca²⁺)
– 0.2–0.3 g sodium bicarbonate per L (≈50–70 mg HCO₃⁻)